A new Quarkus extension: Wicket
As you might expect from one of the earliest contributors to Apache Wicket, it is hard to let go of such a great product (especially if you work every day with it).
And if you also enjoy working with Quarkus, it is only logical that you want to combine the two of them. So I did.
I’ve crafted an extension for Quarkus for Wicket. This enables injection of CDI beans into your Wicket components, behaviors and sessions. It also configures Wicket based on the Quarkus profile (prod, dev, …).
Getting started with the extension
As the extension is as of yet not officially released, you have to mvn install it into your local repository after checking out the source.
gh repo clone dashorst/quarkus-wicket && cd quarkus-wicket && mvn install
cd ..
mvn io.quarkus.platform:quarkus-maven-plugin:3.23.0:create \                                                                                                                                                     ─╯
    -DprojectGroupId=com.martijndashorst.quarkus \
    -DprojectArtifactId=wicket-getting-started \
    -Dextensions='io.quarkiverse.wicket:quarkus-wicket:999-SNAPSHOT,jdbc-h2,hibernate-orm-panache' \
    -Dcode \
    -Djava=21
cd wicket-getting-started
This generates a project with the following structure:
pom.xml
src/main/java/com/martijndashorst/quarkus/
    MyApplication.java
    MyEntity.java
    MyPage.java
src/main/resources/
     application.properties
     import.sql
src/main/resources/META-INF/
    web.xml
The MyApplication class is the Wicket Application you use to configure Wicket and provide the home page to Wicket, which is the default page that gets rendered when the user hits your application.
The codestart defines that the MyPage class is the home page and is automatically generated for you.
The MyEntity class is a Panache ORM entity generated by the codestart.
The web.xml file defines the servlet filter that directs traffic to Wicket.
The file import.sql is the sql script generated by Panache to provide an initial filling for your database.
[!NOTE]
you should uncomment the lines in the import.sql script to get an initial database filling.
When you start the application using quarkus the following happens:
quarkus dev
2025-05-28 21:27:04,440 INFO  [io.qua.hib.orm.dep.dev.HibernateOrmDevServicesProcessor] (build-13) Setting quarkus.hibernate-orm.database.generation=drop-and-create to initialize Dev Services managed database
********************************************************************
*** WARNING: Wicket is running in DEVELOPMENT mode.              ***
***                               ^^^^^^^^^^^                    ***
*** Do NOT deploy to your live server(s) without changing this.  ***
*** See Application#getConfigurationType() for more information. ***
********************************************************************

__  ____  __  _____   ___  __ ____  ______
 --/ __ \/ / / / _ | / _ \/ //_/ / / / __/
 -/ /_/ / /_/ / __ |/ , _/ ,< / /_/ /\ \
--\___\_\____/_/ |_/_/|_/_/|_|\____/___/
2025-05-28 21:27:04,550 INFO  [io.qua.wic.run.arc.ArcInjector] (Quarkus Main Thread) ArcComponentInjector initialized

2025-05-28 21:27:04,556 INFO  [org.apa.wic.Application] (Quarkus Main Thread) [wicket.wicket-quarkus] init: Wicket core library initializer
2025-05-28 21:27:04,556 INFO  [org.apa.wic.pro.htt.WebApplication] (Quarkus Main Thread) [wicket.wicket-quarkus] Started Wicket version 10.5.0 in DEVELOPMENT mode
2025-05-28 21:27:04,598 INFO  [io.quarkus] (Quarkus Main Thread) wicket-getting-started 1.0.0-SNAPSHOT on JVM (powered by Quarkus 3.19.4) started in 0.300s. Listening on: http://localhost:8080
2025-05-28 21:27:04,598 INFO  [io.quarkus] (Quarkus Main Thread) Profile dev activated. Live Coding activated.
2025-05-28 21:27:04,598 INFO  [io.quarkus] (Quarkus Main Thread) Installed features: [agroal, cdi, hibernate-orm, hibernate-orm-panache, jdbc-h2, narayana-jta, servlet, smallrye-context-propagation, vertx, wicket]
2025-05-28 21:27:04,599 INFO  [io.qua.dep.dev.RuntimeUpdatesProcessor] (vert.x-worker-thread-1) Live reload total time: 0.656s
And when you open the browser and go to http://localhost:8080, you get this image
Getting data into and from the database
So the import script takes care of getting the first data into the database.
Now we want to show that on the page in a list, so the MyPage class gets the following code:
import java.util.List;

import org.apache.wicket.markup.html.WebPage;
import org.apache.wicket.markup.html.basic.Label;
import org.apache.wicket.markup.html.list.ListItem;
import org.apache.wicket.markup.html.list.ListView;
import org.apache.wicket.model.LoadableDetachableModel;

public class MyPage extends WebPage {
    private static final long serialVersionUID = 1L;

    public MyPage() {
        add(new ListView<MyEntity>("entities", LoadableDetachableModel.of(this::getEntities)) {
            private static final long serialVersionUID = 1L;

            @Override
            protected void populateItem(ListItem<MyEntity> item) {
                item.add(new Label("field", item.getModel().map(MyEntity::getField)));
            }
        });
    }

    private List<MyEntity> getEntities() {
        return MyEntity.listAll();
    }
}
This creates a ListView and adds a Label component for each entity found in the database.
I had to add a getter/setter to MyEntity in order to bind the getter to the label.
This also needs some markup to go with it:
<!DOCTYPE html>
<html xmlns:wicket="http://wicket.apache.org" lang="en" dir="ltr">
<head>
    <meta charset="UTF-8">
    <title>My Page</title>
</head>
<body>
    <h1>My Page</h1>
    <ul>
        <li wicket:id="entities"><span wicket:id="field"></span></li>
    </ul>
</body>
</html>
So if you refresh the page now, this will show the 3 entities that have been added to the database using the import script as shown in the following screen shot.
Conclusion
In this article I presented you with the Quarkus Wicket extension. I showed how to use that to generate a Quarkus + Wicket + Hibernate + Panache application to display a list of entities on a Wicket page.
The Quarkus Wicket extension is a very young technology, and comes with some limitations you can read in the project’s documentation.
Now go ahead and try Wicket and Quarkus yourself!
Clean your stack traces with one line of shell script
One of the biggest issues with stack traces in Java web applications (Jakarta EE and/or Spring alike) is the enormous stack traces they produce when you get an error.
It is easy to just give up and start drinking. But you can make the stack traces a bit more palatable by just filtering the stack trace such that only the method calls from your own classes remain.
A typical stack trace in one of our applications has 3 caused by’s and counts 127 lines. After my trick, which keeps the ERROR line (the log level), all lines with our company’s package name and all Caused By’s, the remaining line count is 17.
Going from 127 lines of stack trace to just 17…
This simple one-liner for macOS cleans your stack trace into something readable:
pbpaste | grep -i -E 'nl.topicus.|ERROR|caused' | pbcopy
For linux users:
xsel --clipboard --output | grep -i -E 'nl.topicus.|ERROR|caused' | xsel --clipboard --input
For Windows users (“it’s complicated”):
powershell.exe -Command "Get-Clipboard" | grep -i -E 'nl.topicus.|ERROR|caused' | clip
You have to substitute nl.topicus. with your own package name of course, but for our company this works really well.
CDI producer for HTMX headers (in Qute templates)
At €€€-dayjob I’m in the fortunate position to be able to write a HTMX application using Quarkus and Qute’s HTML templates. As such I had the need to identify if a request was performed regularly or through a HTMX call. With a small amount of CDI code this was achieved without much fuzz.
An example of its use in a template:
{#if cdi:htmx.isHtmxRequest}
<small hx-swap-oob="outerHTML" id="lastUpdated">{lastUpdated}</small>
{/if}
The example above will include the <small> HTML fragment to be swapped out-of-bounds
in the response when the request was performed using HTMX, and omit the <small>
fragment when the Qute template is rendered using a normal, non-HTMX request.
HTMX will set the HX-Request: true header in the request to your server when it
issues a request. Using the JAX-RS @HeatherParam("XX-Request) annotation we can
retrieve this value for use in our detector.
The following CDI producer that ensures the proper HTMX headers are retrieved
and made available through a request scoped Htmx object.
Design considerations:
Htmxcan’t be a Java record, as those arefinaland CDI requires beans not to be suchHtmxmust be a top level class, or a static one as CDI requires a default constructor- you can’t just produce a
booleanorBooleanas those are not subclasseable (because CDI) - because Quarkus uses ARC as the CDI implementation, they advise (require?) injections to be package private
- to retrieve CDI beans in your Qute template, the bean must be
@Named - you can’t use
@HeaderParamannotations because those are unknown to CDI
import jakarta.enterprise.context.RequestScoped;
import jakarta.enterprise.inject.Produces;
import jakarta.inject.Named;
import jakarta.inject.Singleton;
import jakarta.ws.rs.HeaderParam;

@Singleton
public class HtmxHeaderProducer {
    public static class Htmx {
        private boolean htmxRequest;

        private boolean htmxBoosted;

        Htmx(boolean htmxRequest, boolean htmxBoosted) {
            this.htmxRequest = htmxRequest;
            this.htmxBoosted = htmxBoosted;
        }

        public boolean isHtmxRequest() {
            return htmxRequest;
        }

        public boolean isHtmxBoosted() {
            return htmxBoosted;
        }
    }

    @Inject
    HttpHeaders headers;

    @Produces
    @Named("htmx")
    @RequestScoped
    public Htmx getHtmx() {
        var hxRequest = headers.getHeaderString("HX-Request");
        var hxBoosted = headers.getHeaderString("HX-Boosted");

        return new Htmx("true".equals(hxRequest), "true".equals(hxBoosted));
    }
}
If you want provide more HTMX-header functionality, it should be fairly easy to implement those in this CDI producer. Enjoy!
List (and delete) git branches that have been rebased and merged
Whenever you rebase and merge a branch, git will not discover the local branch as being merged. So as I use ticket numbers as branch names and use the ticket number in the commit summary (together with a more descriptive summary and body) I can use the log to see if a branch was merged.
The following oneliner bash script below will check if the branch name exists in the log of the current branch (usually main) and generate corresponding delete branch git calls.
git for-each-ref --format='%(refname:short)' refs/heads | grep -v main | while IFS= read -r branch; do
    if [[ $(git log -1 --grep "$branch") ]]; then
        echo "git branch -D $branch"
    fi
done
So given a local branch with name JIRA-banana, and a commit with a
message like JIRA-banana fixed NPE in FooBar which was rebased and merged
with main, so the local head commit(s) don’t match with what was merged,
this will show the branch as merged.
In a single line command:
git for-each-ref --format='%(refname:short)' refs/heads | grep -v main | while IFS= read -r branch; do if [[ $(git log -1 --grep "$branch") ]]; then echo "git branch -D $branch" ; fi ; done
Output:
git branch -D JIRA-banana
Now available: HTMX: Web 1.0 with the benefits of Web 2.0 without the grift of Web 3.0-at JFall 2023
The HTMX presentation I gave at J-Fall 2023 is now available for wachting for all at Youtube.
The video can be watched below, or when you follow this link. Enjoy my Dunglish!
HTMX: Web 1.0 with the benefits of Web 2.0 without the grift of Web 3.0-at JFall 2023
JFall 2023 is a Dutch Java User Group 3-day conference packed into 1 day, and this year celebrated its 20th anniversary!
I was honored to be able to present at the conference and my presentation “HTMX: Web 1.0 with the benefits of Web 2.0 without the grift of Web 3.0” was selected. In this post I’m giving you the cliff notes of the presentation and the slides, as we eagerly await the upload of the recorded video.
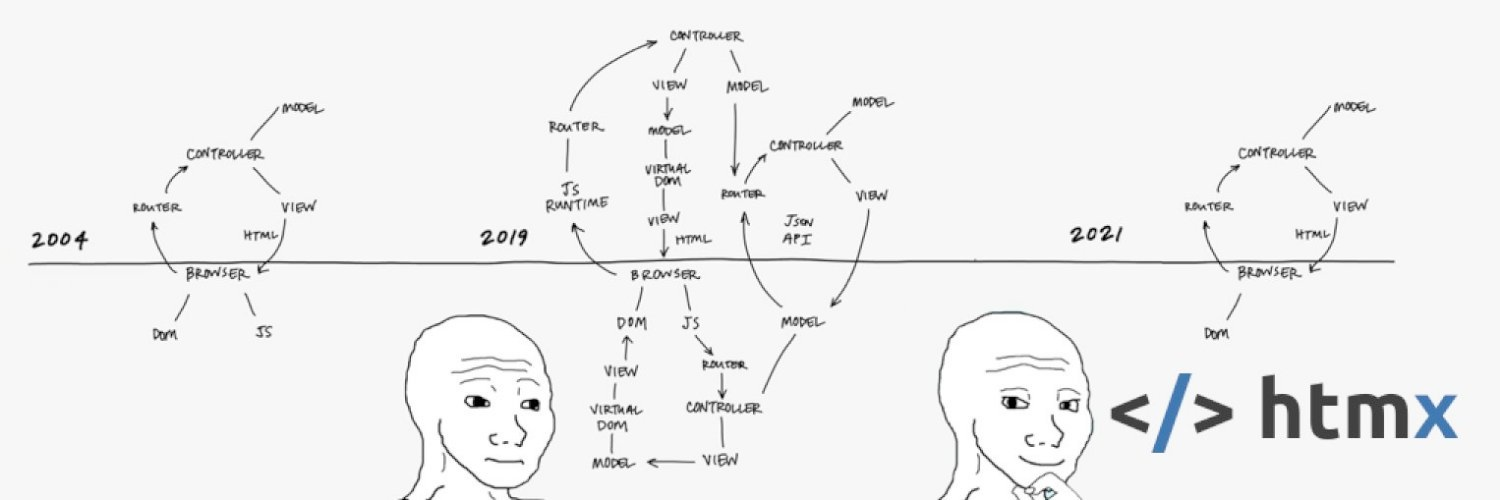
These are the slides:
What is HTMX?
HTMX is a client side javascript library that extends HTML using attributes to enable interactivity and dynamic web pages.
Why does HTMX exist?
Current web architecture focusses on oodles of JavaScript and SPA’s to work around the limitations of HTML as a client side application platform:
- HTML only provides GET and POST, and
- only and <form> tags provide client-server communication
Effectively HTML is stuck in 1995. SPA’s solve the “stuck in 1995” problem by working around HTML. HTMX solves the problem by extending HTML
How does HTMX work?
HTMX provides the following to extend HTML, augment the client-server communication and allow you to provide rich user experiences.
- attributes on elements
- request and response headers to give server a way to respond to and direct HTMX
- classes for animations and indicators
- events for hooking into the various stages of HTMX and provide additional interactivity
- javascript functions for configuring HTMX and working with classes, finding and working with elements, and adding extensions
- extensions to provide more functionality like websockets, server-sent events and various DOM morphing algorithms
In the presentation I gave some examples for each of these HTMX additions, and then I proceeded to give a live demo.
A live demo
The live demo consisted of two parts:
- HTMX core functionality htmx-jfall
- A websocket multiplayer flag guessing game Fun with Flags
You can find the code at github (see the links).
Conclusions
With HTMX a backend developer can now make HTML pages more dynamic without having to switch to a full client-side application build. You just render out HTML and progressively enhance the application with HTMX tags and such to make a rich application.
I heartily recommend checking out HTMX and give it a 9/10.
HTMX in Action
I’m becoming more and more a fan of htmx, and there’s a companion book written by the author(s) of htmx:
The revolutionary ideas that empowered the Web
A simpler approach to building applications on the Web and beyond with htmx and Hyperview
Enhancing web applications without using SPA frameworks
Fixing Eclipse won't start issue on macOS
Sometimes, when you update your Eclipse plugins, it won’t start after you’ve shut it down (e.g. after a reboot). This means that the system finds that the Eclipse application bundle has different cryptographic signature than when it was installed.
To check if the signature is (in)valid you can use this Terminal command:
$ pkgutil --check-signature /Applications/Eclipse\ 2023.09.app
Package "Eclipse 2023.09":
   Status: package is invalid (checksum did not verify)
When the signature is invalid, you need to recalculate the signature:
$ codesign --force --deep --sign - /Applications/Eclipse\ 2023.09.app
/Applications/Eclipse 2023.09.app: replacing existing signature
And voilà! your Eclipse will start again.
React, communism, agile and being a Scotsman
If you use React right, it’s gonna work out… Just like communism, agile and being a Scotsman
HTMX and Quarkus First Impressions
I’ve been eyeing HTMX ever since I’ve laid my eyes on it, and already want to build applications using Quarkus. Fortunately €€€ dayjob provides the opportunity to combine both to build an internal tool to run several SQL scripts after one another. In this post I wanted to note my first impressions.
What is HTMX in a nutshell?
It is a JavaScript library that enables Hypertext As The Engine Of Application State (HATEOAS) in the browser by using attributes to declaritively specify what actions need to be taken and which element needs to be replaced by the HTML response of the action. HTMX issues mostly AJAX requests and integrates with the history API. It is fully HTML driven, no additional JavaScript is necessary, only if you want pure clientside functionality.
<div hx-get="/banana" hx-target="#strawberry">Click me</div>

<div id="strawberry">gets replaced by the HTML that is returned after the AJAX GET</div>
Clicking the Click me text inside the first div element will issue an AJAX GET request to the /banana endpoint on the server.
The request should respond with a HTML fragment that will replace the strawberry div.
HTMX takes care of all the plumbing.
My notes
- Quarkus: it is rather easy to get started and add new plugins
- For this project I needed Qute templates and JAX-RS (so rest-easy)
- Including HTMX is just using a
<script>tag - Using HTMX is just using the proper
hx-XYZattributes on your DOM elements - Most uses for rich clients are present in the HTMX API: updating multiple elements in one go, events, history, etc.
- Rethinking how to do templating and setting up HTML endpoints for the UI is challenging coming from a Wicket history
As you might know I have a pretty strong Wicket background. So the serverside rendering component of HTMX and low-JavaScript usage appeals to me considerably. I have to re-learn some stuff to actually get good in the HTMX and HATEOAS mindset, and to combine multi-element updates instead of relying on full page refreshes (which HTMX takes good care of!)
I have created an already quite complicated UI with:
- a sidebard menu containing our projects,
- a row of tabs containing the contents of each project,
- a list of (SQL) files and a SQL previewer,
- a previewer that syntax highlights the TSQL files
- a link to github to directly edit the SQL file
And all these items are linked together already, with a minimum of Java code, HTML and no JavaScript of my own.
Tally for now:
- 94 lines of HTML templates
- 173 lines of Java code (sloccount)
- bootstrap 5.3 (and bootstrap icons)
- highlightjs + highlight-tsql
- HTMX
Next up
- securing the thing with OIDC + Topicus Keyhub
- connecting the project to a local git checkout of our project(s)
- making the scripts runnable against a database
In conclusion
The fun part when compared to writing Wicket pages is that you can easily edit the HTML templates to add functionality. It is further enhanced by the quick reloading of my currently 3 Java classes by Quarkus’ development mode.
The hardest part for me is to figure out how to make this all maintainable and discoverable. The Qute templating engine is nice, and Quarkus has some decent defaults, so probably I need to adhere to those standards more.
The next weeks will be fun and filled with learning!
Quarkus with JPA model on the test class path
I’m working on an application for €€€ day job, and I want to use Quarkus because the plugins provide pretty good support for what I am wanting to achieve. The application is a CLI application that will merge the contents of two tenant databases (same schema) into one databse. For this functionality I want to write some unit tests (yeah, I know). To generate a test model and database schema I want to use JPA (Hibernate) to quickly create and fill the schema.
I put the JPA entities on the test class path:
src/main/java/banana/CliCommand.java
src/test/java/banana/model/Tenant.java         <|-- Entity
src/test/java/banana/model/TenantAccount.java  <|-- Entity
Unfortunately when I start Quarkus in dev mode, Hibernate complains that it can’t find any entities, so it disables itself:
WARN [io.qua.hib.orm.dep.HibernateOrmProcessor] (build-27) Hibernate ORM is disabled because no JPA entities were found
I tried googling for this, but couldn’t come up with an answer, so I asked the question on Stack Overflow, and within 30 minutes or so I got the answer:
Just put the
io.quarkus:quarkus-hibernate-orm-panachedependency on the<scope>test</scope>scope, and everything will work as you intended.
And that works!
Open Graph Protocol Headers Enabled
From this article about Open Graph Headers for Mastodon I thought that I also needed to update my blog to make it more friendly for Mastodon as that works with standards rather than trying to define them.
So I’ve updated my blog template to use open graph protocol headers identifying the blog posts. I also updated the default protocol for my blog to be HTTPS instead of HTTP (so 2017).
Here’s to hoping the updated headers make my blog posts preview prettier on Mastodon!
Toggle Show Hidden Files in Finder and Dialogs on macOS
Today I Learned how to toggle “Show Hidden Files” in Finder (and dialogs) on macOS:
cmd + shift + .
Awesome: this makes for example searching for JDKs installed using SDKman much easier, or finding custom Maven settings.
Fix 'The application 'Eclipse' can't be opened' Error on macOS
You restart your Mac, and after booting up you double click on your Eclipse.app icon. MacOS throws you a popup with the error that it can’t open your carefully curated IDE and plugins. Many hours of updates and plugin selections are on the edge of the bin. What can you do? Redownload Eclipse, and go through the hours of updating your settings and plugins?
No more! Apparently the code signature of the Eclipse.app package is not equal to the contents of the package, preventing it from starting up.
Using the following shell command you can re-sign the Eclipse.app package (if you’re sure it should be resigned of course), enabling it to restart again:
sudo codesign --force --deep --sign - /Applications/Eclipse.app
It took quite a while on my machine to complete, but that time was a lot shorter than having to download and re-install.
Many thanks to the folks at stackoverflow.com for having an anwser readily available.
GIT Tip: Git Grep Terms Across Multiple Lines in Files
A small GIT tip: when you want to find a file where multiple terms can occur spread across multiple lines.
Git grep is an awesome tool in your toolbox: it is blazingly fast at finding stuff and pretty flexible it turns out.
Java (and other programming languages) will often split a line of code across multiple lines because our common width of files typically doesn’t exceed 120 characters in editors. So you get split constructor calls, or using the stream API you want to all places where you sort and make the results unique:
people.stream()
    .distinct()
    .sorted(Comparator.comparing(Person::getLastName)
    .collect(Collectors.toList());
If you want to find this, a naive attempt would be to search for these terms directly:
% git grep -e "distinct()" --and -e "sorted("
But this will only find files that have the terms distinct() and sorted( on a single line, and that is not what we want.
Fortunately git grep has a solution for that: --all-match in combination with --or:
% git grep --all-match -e "distinct()" --or -e "sorted("
This will find all files that have a line with distinct() or sorted(.
DBeaver Crash Due to Corrupt Font Cache on Fedora Solved
Unfortunately DBeaver is not as stable as I’d like on Fedora (35) and just today it wanted to restart due to an exception, and that didn’t work any more as it crashed during startup.
If the crash log shows something like this:
Jan 27 10:58:09 dbeaver-ce_dbeaver-ce.desktop[417763]: Fontconfig warning: FcPattern object weight does not accept value [0 205)
Jan 27 10:58:09 dbeaver-ce_dbeaver-ce.desktop[417763]: #
Jan 27 10:58:09 dbeaver-ce_dbeaver-ce.desktop[417763]: # A fatal error has been detected by the Java Runtime Environment:
Jan 27 10:58:09 dbeaver-ce_dbeaver-ce.desktop[417763]: #
Jan 27 10:58:09 dbeaver-ce_dbeaver-ce.desktop[417763]: #  SIGSEGV (0xb) at pc=0x00007f1d7a42790f, pid=417763, tid=417764
Jan 27 10:58:09 dbeaver-ce_dbeaver-ce.desktop[417763]: #
Jan 27 10:58:09 dbeaver-ce_dbeaver-ce.desktop[417763]: # JRE version: OpenJDK Runtime Environment Temurin-11.0.12+7 (11.0.12+7) (build 11.0.12+7)
Jan 27 10:58:09 dbeaver-ce_dbeaver-ce.desktop[417763]: # Java VM: OpenJDK 64-Bit Server VM Temurin-11.0.12+7 (11.0.12+7, mixed mode, tiered, compressed oops, g1 gc, linux-amd64)
Jan 27 10:58:09 dbeaver-ce_dbeaver-ce.desktop[417763]: # Problematic frame:
Jan 27 10:58:09 dbeaver-ce_dbeaver-ce.desktop[417763]: # C  [libpangoft2-1.0.so.0+0x990f]
Then something probably corrupted the fontconfig cache. You can remove that using:
sudo rm /var/cache/fontconfig/*
rm ~/.cache/fontconfig/*
And voila! DBeaver did startup again.
Getting Exchange to work with Fedora 35 GNOME Calendar
Getting Fedora (35) to work with Exchange and having your calender show the appointments is really, really nice. Unfortunately even though the settings app allows you to configure an exchange account, it doesn’t sync with the Gnome Calendar app out-of-the-box.
Lo and behold, you need to install additional software to make this work:
% sudo dnf install -y evolution-ews
will install Evolution Exchange Web Services on your system. This allows Gnome Calendar to retrieve your appointments. I did see some crashes of some related service, but after reconfiguring the exchange account information I now have my appointments on my Fedora 35 system.
Easy JDK selection using SDK-man
![]()
SDKMan is a great tool for installing Java versions and a lot more. But it is not handy when you just want to switch between Java 11 and Java 17 on the commandline:
$ sdk use java 17.0.1-tem

Using java version 17.0.1-tem in this shell.
You have to provide the full version and vendor (in my case Eclipse Temurin) for SDKMan to select the JDK of choice.
But I just want to say sdk 17 or sdk 11. On macOS you can use the default installers and use /usr/libexec/java_home
to select the right Java version. But unfortunately SDKMan doesn’t provide such an experience.
In order to get this:
$ jdk 17

Using java version 17.0.1-tem in this shell.
I wrote the shell function below to select the top installed version for the JDK you request:
function jdk() {
    sdk use java $(sdk ls java | grep -E "(\s+installed|\s+local only)" | grep "\s$1" | awk '{print $NF}' | head -1)
}
It uses SDKman’s functionality to:
- list the installed java versions,
- filters out the installed java versions,
- filters the requests versions (you can have multiple installed, e.g. 17.0.0-tem and 17.0.1-tem)
- selects the last column of the SDKman line
- instructs SDKman to use that version
Have fun with this one!
PS Updated the jdk() function to use "\s$1" to match at the beginning of the version string.
Generate Java 16/17+ records from JDBC resultset
Since I couldn’t surface anyone using Java records and generating them from a JDBC result set (as a lazy programmer I want to type as less code as I possibly can), here’s a method that just does that.
Caveats: some types are not generated correctly (e.g. arrays), but you can easily modify those types as you like.
public static void resultSetToJavaRecordCodeGenerator(ResultSet rs) throws SQLException
{
	while (rs.next())
	{
		System.out.println("public record ChangeMyName(");
		var komma = "  ";
		for (int i = 1; i <= rs.getMetaData().getColumnCount(); i++)
		{
			var typeName = rs.getMetaData().getColumnClassName(i).replace("java.lang.", "");
			var fieldName = StringUtil.firstCharLowercase(rs.getMetaData().getColumnName(i));
			System.out.print("\t");
			System.out.print(komma);
			System.out.print(typeName);
			System.out.print(" ");
			System.out.println(fieldName);
			komma = ", ";
		}
		System.out.println(")");
		System.out.println("{");
		System.out.println("}");
		break;
	}
}
Given for example the columns returned from a SqlServer RESTORE HEADERSONLY FROM DISK='/dumps/...' you get this Java record:
public record ChangeMyName(
	  String backupName
	, String backupDescription
	, Short backupType
	, java.sql.Timestamp expirationDate
	, Short compressed
	, Short position
	, Short deviceType
	, String userName
	, String serverName
	, String databaseName
	, Integer databaseVersion
	, java.sql.Timestamp databaseCreationDate
	, Long backupSize
	, java.math.BigDecimal firstLSN
	, java.math.BigDecimal lastLSN
	, java.math.BigDecimal checkpointLSN
	, java.math.BigDecimal databaseBackupLSN
	, java.sql.Timestamp backupStartDate
	, java.sql.Timestamp backupFinishDate
	, Short sortOrder
	, Short codePage
	, Integer unicodeLocaleId
	, Integer unicodeComparisonStyle
	, Short compatibilityLevel
	, Integer softwareVendorId
	, Integer softwareVersionMajor
	, Integer softwareVersionMinor
	, Integer softwareVersionBuild
	, String machineName
	, Integer flags
	, String bindingID
	, String recoveryForkID
	, String collation
	, String familyGUID
	, Boolean hasBulkLoggedData
	, Boolean isSnapshot
	, Boolean isReadOnly
	, Boolean isSingleUser
	, Boolean hasBackupChecksums
	, Boolean isDamaged
	, Boolean beginsLogChain
	, Boolean hasIncompleteMetaData
	, Boolean isForceOffline
	, Boolean isCopyOnly
	, String firstRecoveryForkID
	, java.math.BigDecimal forkPointLSN
	, String recoveryModel
	, java.math.BigDecimal differentialBaseLSN
	, String differentialBaseGUID
	, String backupTypeDescription
	, String backupSetGUID
	, Long compressedBackupSize
	, Short containment
	, String keyAlgorithm
	, [B encryptorThumbprint
	, String encryptorType
)
{
}
And yes, this will not compile because of the [B encryptorThumbprint, but that doesn’t make this method anymore less useable.
Use this to your advantage!
Fedora, Moby Engine, Docker, testcontainers and SELinux

At $dayjob we make a portal that starts docker jobs. For this to work we need to access the Docker API
running on the host. A typical way to make this work is to use the docker socket located in /var/run/docker.sock.
You just mount the socket in your container and point your Docker client to it. This works on macOS and several linux distributions. It works in Production(tm).
Then my macbook pro needed servicing so I installed Fedora on my replacement and figured things would just work out.
When you want to install docker, typically you just type in the executable name of your package manager and install docker:
$ sudo dnf install docker
This command doens’t work out of the box because it asks you to install moby-engine instead. Alright you think: moby-engine is just docker right?
SELinux enters the room
Apparently moby-engine does not work with the cgroups 2 used by SELinux, or tries to do so but fails. There was no way I was able to let my docker client talk to the host through a mounted docker socket. I changed the rights, changed the groups, changed the user. So we YOLO’d the container and put it in production for testing (fortunately the application is used internally by just a couple of users a couple of days in a month). This cost me about 2 days of fiddling, reading and trying stuff. SELinux won.
Next I wanted to use testcontainers.org for testing backup/restore procedures of databases we manage through the docker application. Stepping through the code I saw that they try to start a container for reaping dangling containers that were started during testing. This requires… access to the docker socket.
I tried starting the ryuk container manually using my shell, but the only way to start it was using the privileged flag. Looking at
the code from testcontainers I noticed they already set the container to run privileged (UPDATE Apparently my reading of the code was wrong
and I need to set a flag explicitly to let Ryuk run privileged. The documentation and the mitigation of ryuk at testcontainers is not good in this
instance IMO), so something janky was happening with SELinux.
One of the tickets mentioned reinstalling containerd, to fix the rights. Looking at some other posts they mentioned installing docker-ce.
So I followed the manual for installing docker-ce and lo and behold: everything worked immediately.
While SELinux is probably making my life as a user of Linux safer, it is frustrating that it requires you to become an expert at it before you can actually get work done. At this time I can’t say I am impressed by SELinux.